click to enlarge
Cares & Woes: Design and Technical Challenges
 You can see why I posted these design and technical notes separate from the finished project.
Design: I knew I wanted to put legs on the ATC can – that’s it – I wasn’t sure where I was going from there.
Design thoughts: The legs had to have flat feet. Then tall legs or short legs? From there it was a crap shoot (so to speak). Sometime during the design process – putting things on and taking them off, the purpose (or story) of the ATC tin came to mind and it developed from there.
Technical: The whole assemblage started with the legs, developing as it progressed. I had to keep in mind the process of attachments. Meaning, if I attached the legs to the can as soon as I had finished drawing on them – would they be in the way of any other design elements I decided to attach?
NOTES:
– Flax Seeds are beautiful shades of brown. I didn’t realize how pretty they were until I found them in the grocery store while looking for ginger. Now I have a bag of seeds I need to find a project for.
– A Needle Tool is an indispensable tool in mixed media.
– For A Good Time play with Copic Markers in their air sprayer. Side Note: Impressive Ideas in Roswell, GA has the best price on Copic Markers.
– Old sticks of Hot Glue found at garage sales are not worth the money – even free. The strings will drive you to drink.
– Peat Moss is messy but a good cover. The dirt is useful too.
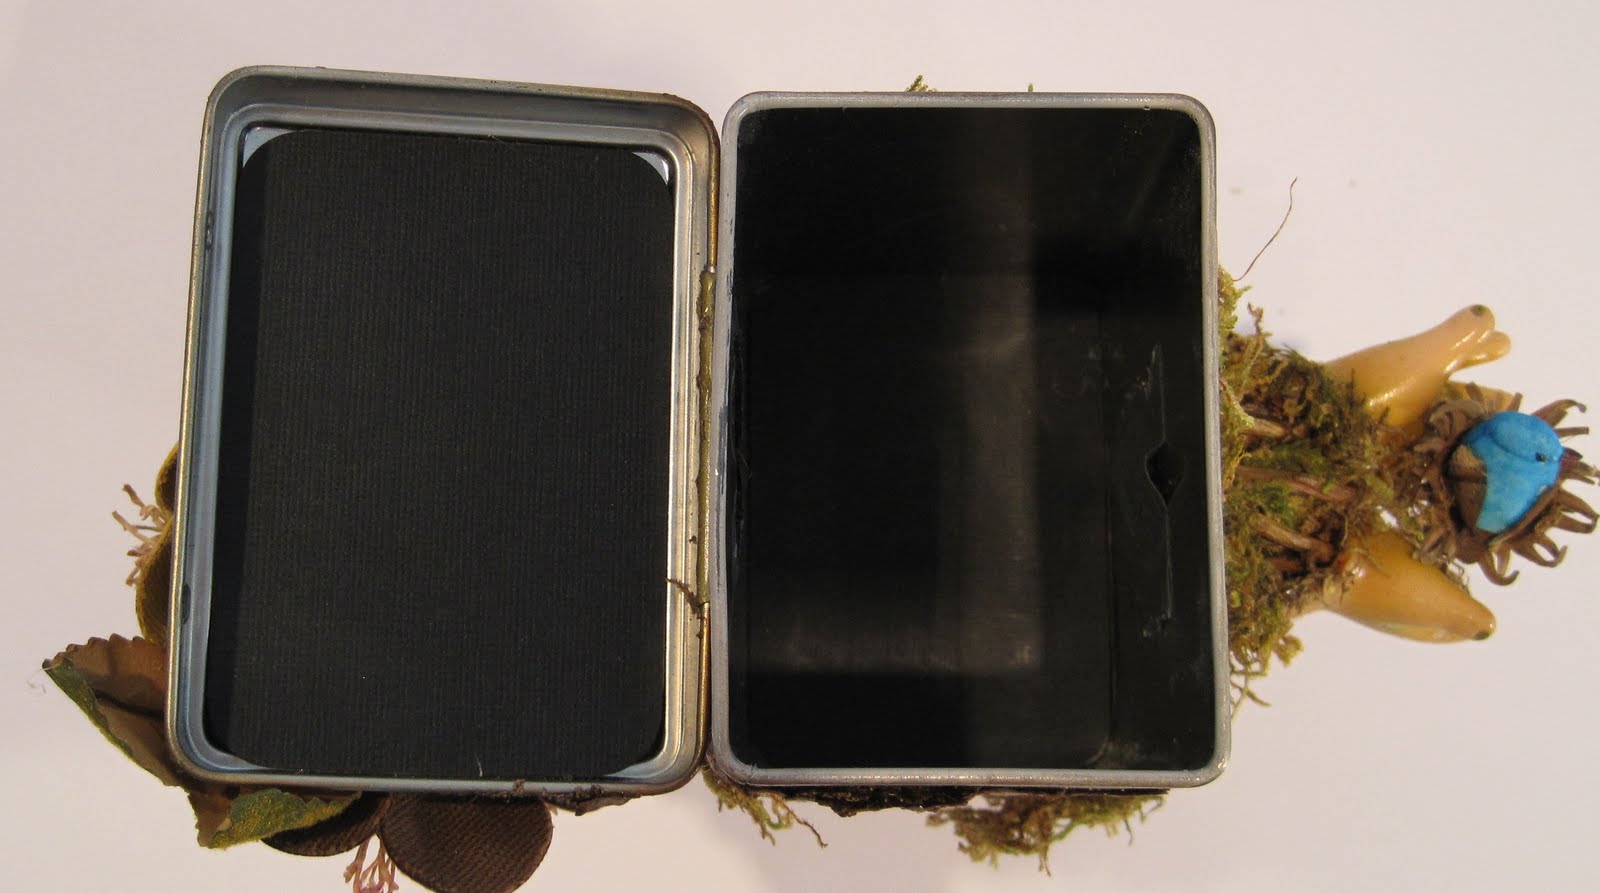
– Don’t neglect the inside of the ATC Tin. Use a metal file to remove any metal burs created by cutting or drilling into the tin. Cover the screws on the inside top and bottom of the tin with thin card board covered with paper. Use a piece of grey or silver duct tape to cover the ends of the wire holding the hands in place (too bulky to cover with card board).
– Patience is required if you’re going to use resin. If your project is on a fast track – choose another option.
– Mixed Media – know when to stop. This is a hard one for me.
On the mark, get set, go!
Legs (I started from the bottom up):  ** I had two pair to choose from (dolls I bought at a thrift store for $2). I was going with the tall ones at first and with a whole different look – but decided on the short tubby ones because they had more of a whimsical look to them and better toes. They also had a substantial flange on the top that could be used to attach them to the can.
** I wanted to Zentangle roots on the legs but discovered the black fine line Copic, Prismacolor and even fine Sharpie markers bled a little on the plastic. I probably could have avoided this had I sprayed a fixative on the vinyl rubber legs first. However, the color Copic Markers worked like a charm. So I drew my design on with a pencil and filled in with the markers. Using the Copic Sprayer, the toes were decorated and the excessively bright flesh color was toned down by spraying on Copic Markers in greens and browns. What a hoot – here’s where I needed to practice restraint!
** The legs were filled with old lead fishing sinkers. The weights allow for the tin to remain standing with the lid open.
** After the slot in the tin was cut out and the tin was decorated with paint and tree bark the legs were attached by making holes in the bottom of the can and inserting screws from the inside of the can into the flange of the legs.
** It took some time to decide how to position the legs…side by side, straight forward – or angled with an attitude. I chose attitude.
ATC Tin: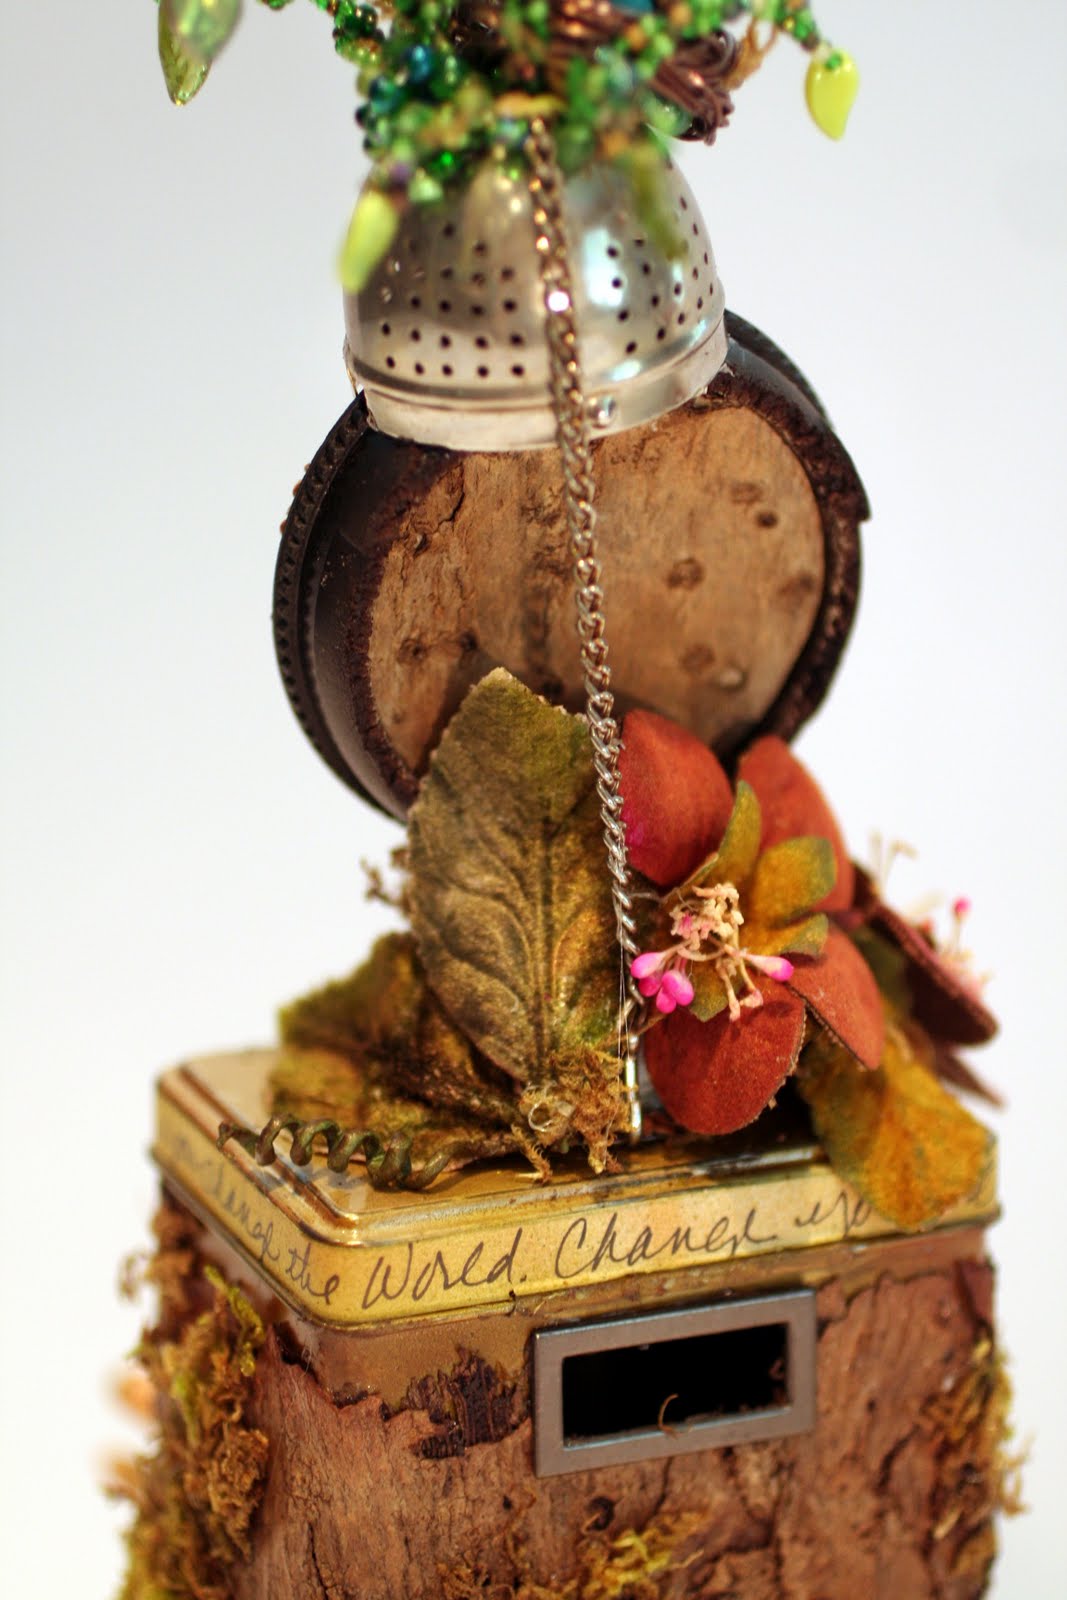 ** Hmmmm – I thought about attaching paper, paper with words, verses, poems, etc. – but that’s not me.
** I remembered that I had a gallon sized bag of tree bark (no thicker than 2-3 sheets of paper) in my stash. Someone at a yard sale noticed I was interested in it and gave it to me, fairly certain no one else would be interested 😉 Although the tree bark was pliable enough to be put on in one piece I decided it was more visually appealing to be glued on in pieces. It was glued on using Ultimate Glue, sprayed with Copic Markers to enhance the depth and a fixative to set the colors.
** The verse was handwritten on paper, cut to size, sprayed with Copic Markers and held in place with double sided tape.
** The slot in the back was cut using a dremel – but I think a very sharp exacto knife (and extreme care) would also work. After tree bark was put on the tin the opening was covered using a metal frame.
** Most of the Peat Moss was glued using a glue gun.
Hands:
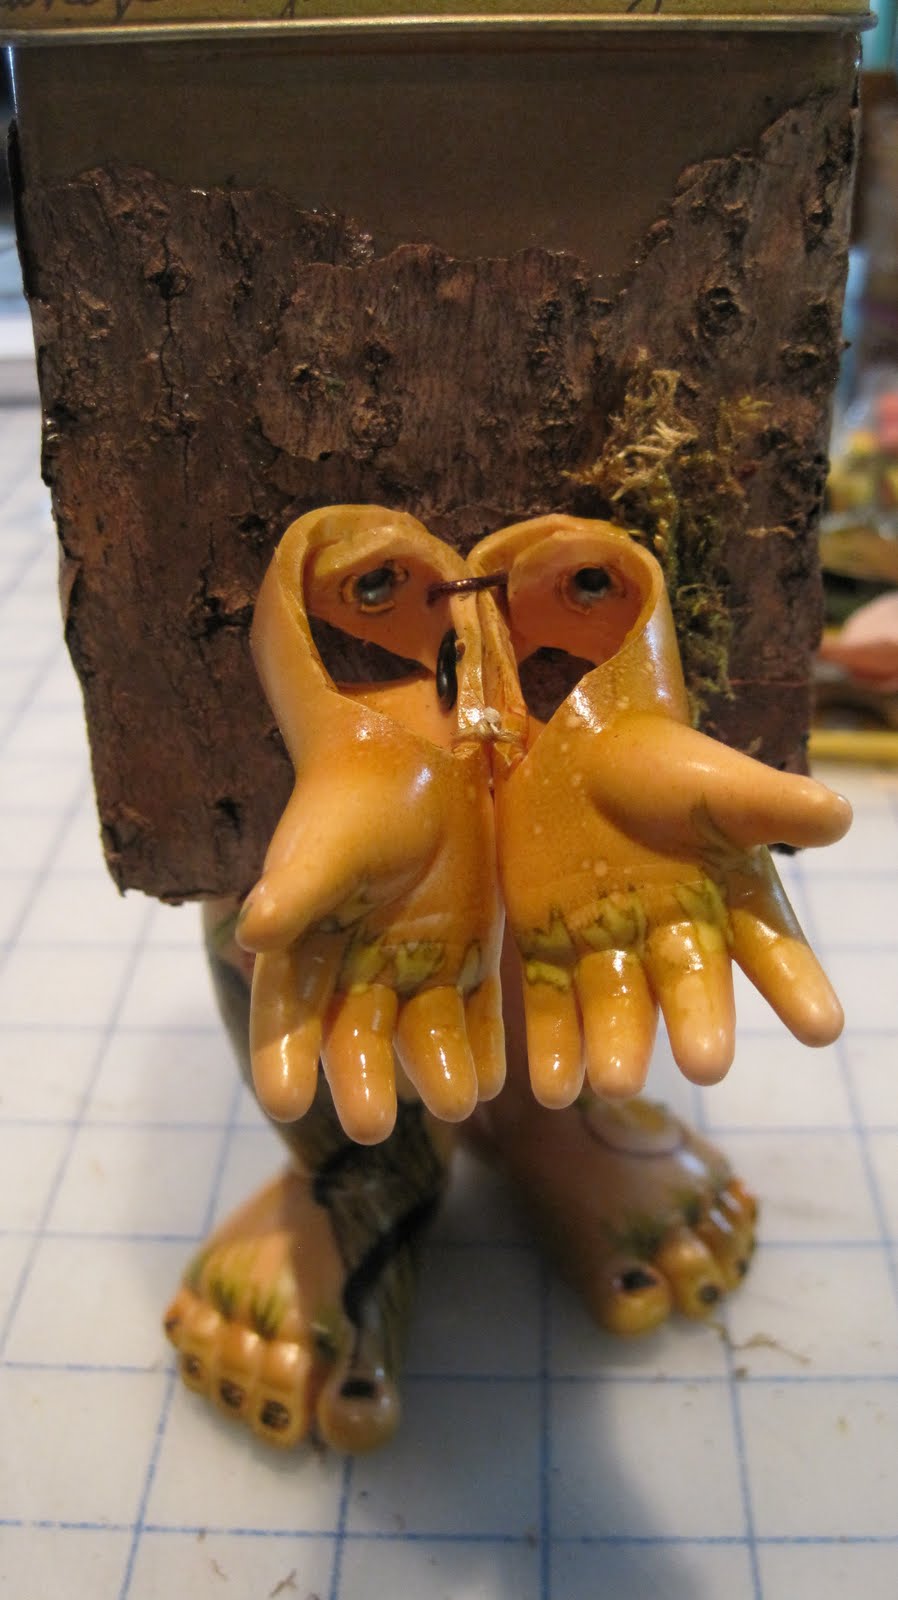
 ** Again I had two pair to choose from. The tubby hands were too comical. The thinner, longer, hands had more delicate fingers but the arms were too long so I cut them down.
** I wanted the arms to look like they were part of the tree/tin so the tops of the arms were cut away leaving the hands intact.
** How to attach them to the tin so they wouldn’t come loose was the challenge. As I cut the arm down I left enough on each side to fold over, attached with eyelets, creating a back. Both arms were also attached with long eyelets. Note: I get my long eyelets from Bonnie’s Best Art Tools – they’re metal, not aluminum and never split.
** The hands were sprayed as the legs were. Two holes were made in the body and the hands were attached using 16 gauge wire. Writing on top of wet sprayed Copic Markers with Copic Markers gives a unique look. The color moves out to the sides – fun.
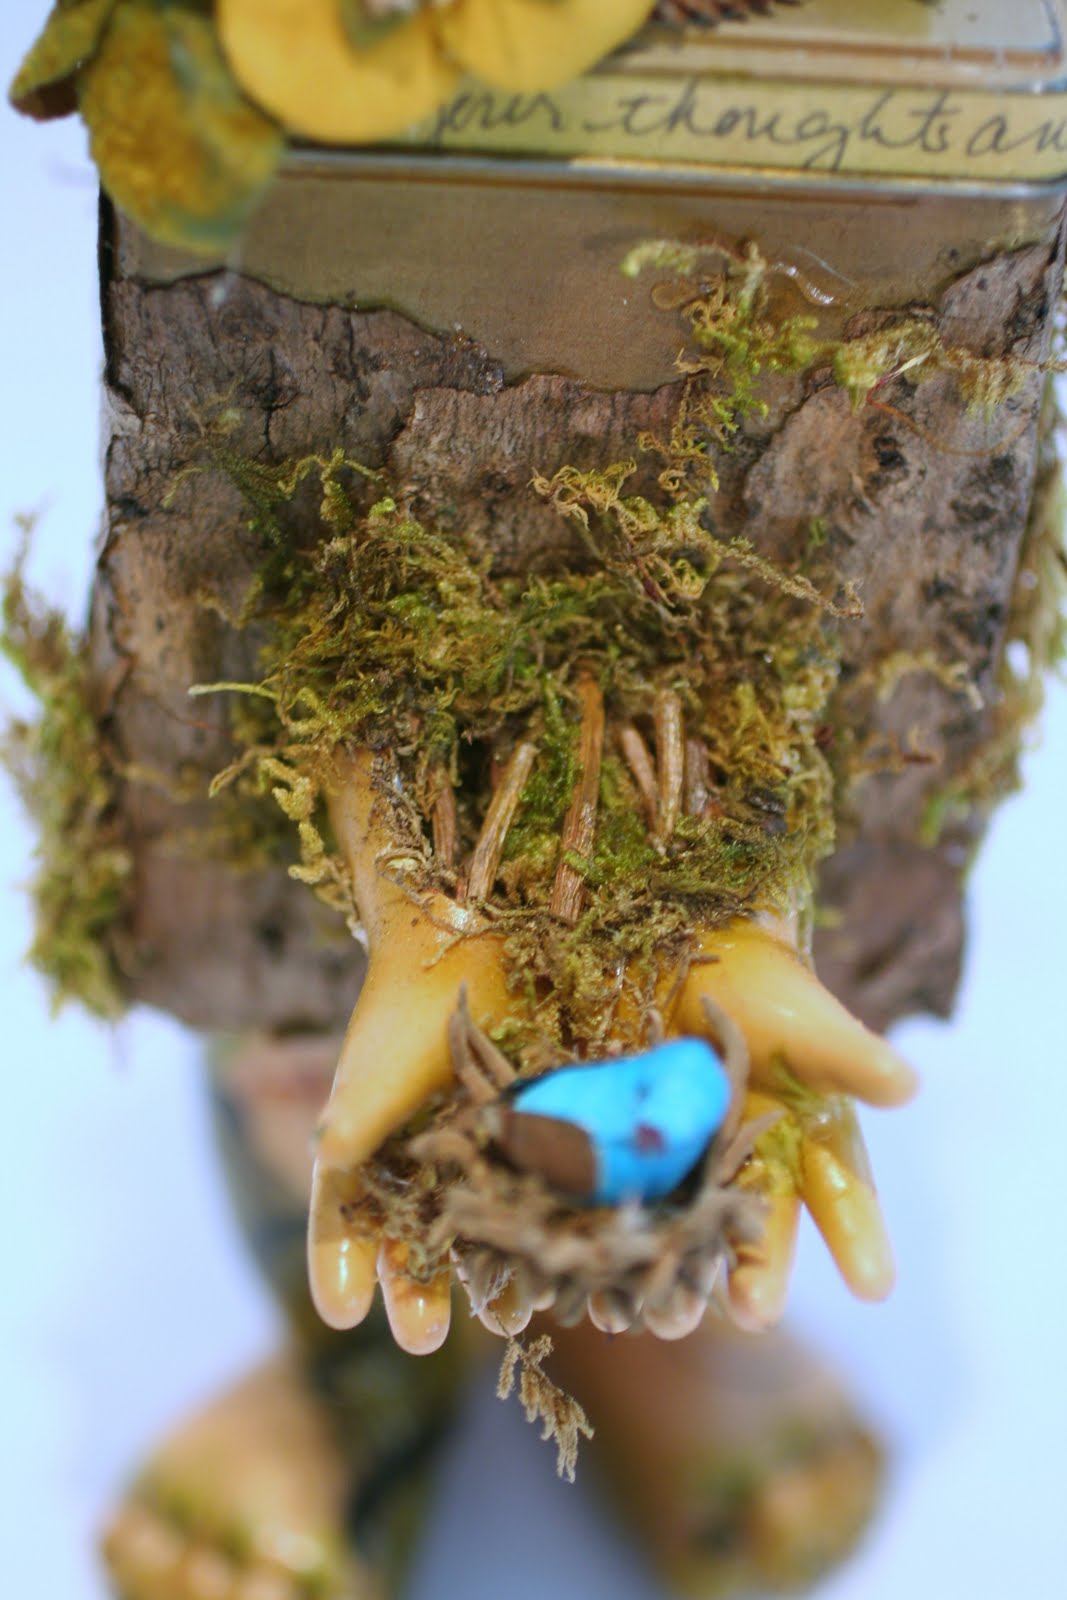
** Twigs were cut to fit inside the arms. Peat Moss and associated dirt were used to cover exposed areas.
** The bird sits in a seed pod I found on vacation a gazillion years ago.
Head:
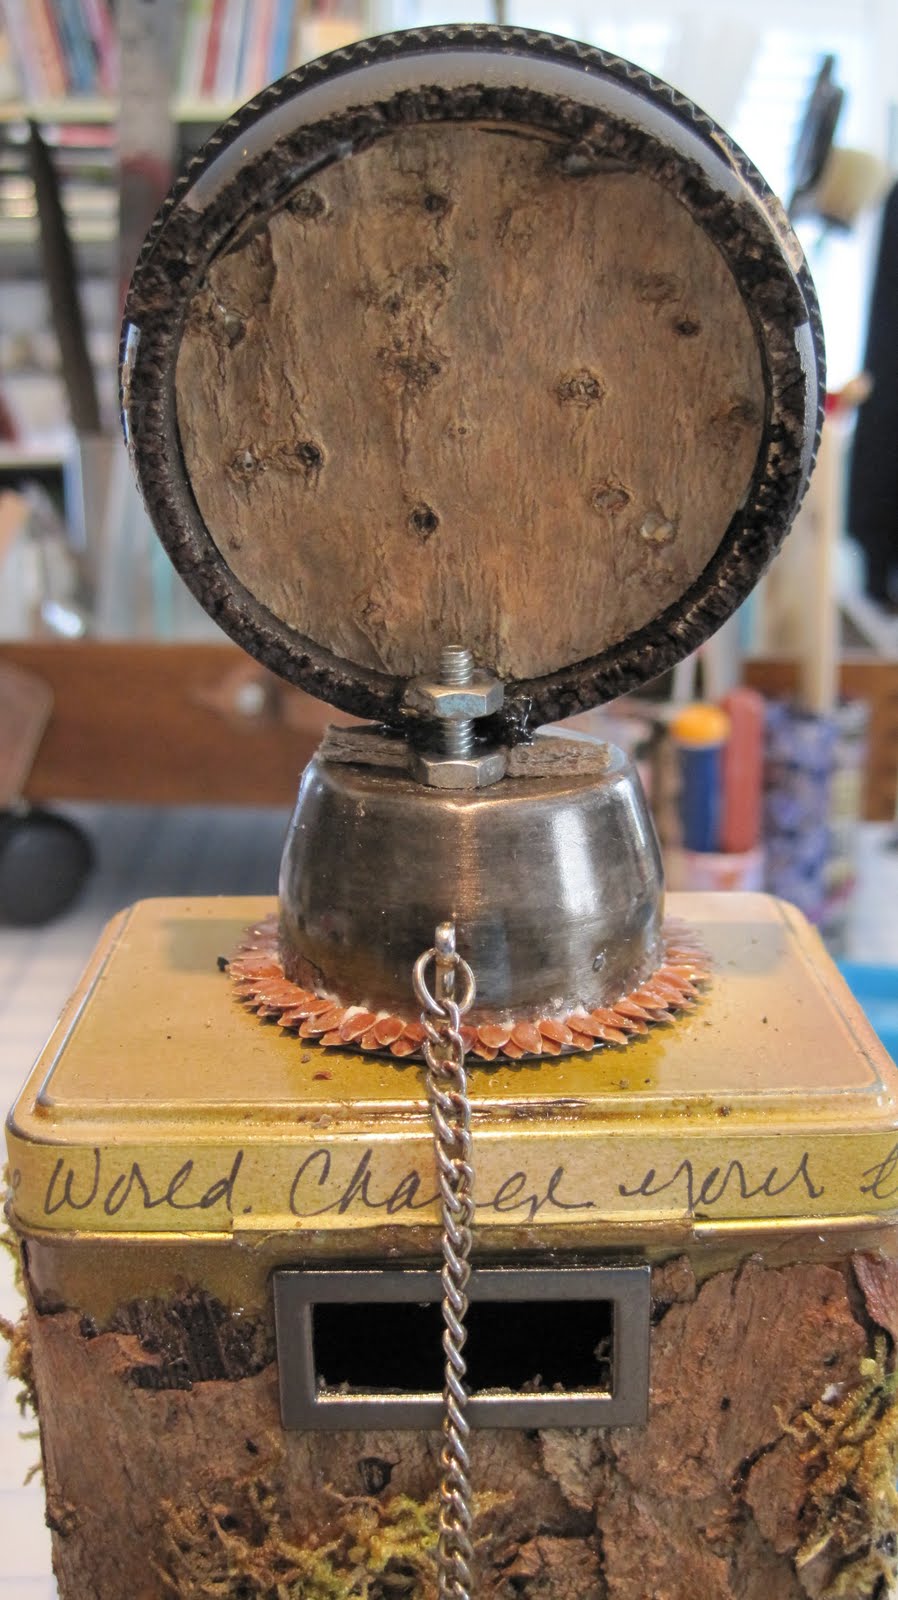 * The circle around the face is a, vintage projector lens ring (without a lens). It was broken off and, due to age, was a little fragile. A notch was made in the back to assist in attaching it to the bottom of the tea strainer.
** I made several impressions of a face stamp (sorry no name on the stamp) on a piece of plain white paper then copied it on beige card stock, reducing the size.
** The images were colored using colored pencils – I used the best one for the head. NOTE: I realized after the Ice Resin was poured that the colors should have been more vivid to show thru the resin.
** The face was sandwiched between two pieces of clear packing tape to prevent the ICE Resin from soaking into the paper and then inserted in the back of the frame. ICE Resin was poured over the face.
** This is the first time I’ve used ICE Resin. I chose ICE Resin because I thought it would “dome” giving the face some dimension – it didn’t – but maybe I needed to add a second pouring after the first had dried. As I used it, I’m not sure it’s really any different from Easy Cast. Easy Cast you can get just about anywhere, using coupons. I found ICE Resin by chance at Hobby Lobby for $11.99 for a 30ml dispenser. But then I haven’t used resin enough to be an experienced judge.
** I accidentally touched the face before it had set up – therefore Peat Moss and Flax Seeds were used to enhance her face 😉
** After attaching the Tea Strainer to the head a circle of Tree Bark was cut to cover the card board and a vintage flower spray was glued on around the neck.
TEA STRAINER:
CAP with holes: ** A nest was made of 12g wire and attached to the head with 24g wire.
** 30g wire was used to thread in and out of the holes, adding glass seed beads and glass leaf shaped beads as I went along.
** The sides were notched to fit over the rim of the head frame. Two square bolts were glued on top of the frame, just inside the cap, with E6000 glue to give the cap a better foundation when glued.
Bottom of Strainer: ** A hole was drilled (although a punch could be used) in the top of the ATC Tin and the top of the bottom of the tea strainer.
** A bolt was inserted from the inside of the ATC lid up thru the top of the Tea Strainer and held in place with a nut.
** The notched frame was put against the bolt, on top of the nut and another nut added on top of the frame – then glued with E6000 glue.
** Flax seeds were glued one by one around the bottom of the strainer using Ultimate Glue.
All body parts, with the exception of the head and hat – were sprayed with a fixative.